Unroll Your Creativity: The Best Continuous Zipper Chains for Every Project
Unlock creative freedom with Zipper by yard! Discover how continuous zippers save money and customize projects perfectly. Get your guide now.
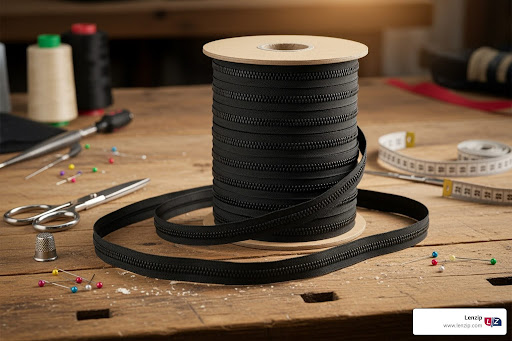
Zipper by yard offers manufacturers and serious sewers the ultimate flexibility in creating custom-length closures for any project. Instead of being limited to pre-made zipper lengths, you can cut exactly what you need from continuous zipper chain.
Quick Answer: What is Zipper by the Yard?
- Continuous zipper chain sold by linear measurement
- No pre-attached sliders or stops – you add them yourself
- Custom lengths from inches to hundreds of yards
- Cost-effective for bulk projects and manufacturing
- Reduces waste by cutting exact measurements needed
After a frustrating and costly trip to a retail store for zippers, many manufacturers have stepped back and said: “there has to be a better way!” That better way is buying zipper by the yard.
This purchasing method transforms how you approach zipper installation. Whether you’re manufacturing automotive interiors, marine covers, or custom bags, continuous zipper gives you complete control over length and configuration.
Key benefits include:
- Perfect fit for non-standard measurements
- Two-way zipper capability by adding pulls from both directions
- Significant cost savings compared to individual pre-made zippers
- Always having stock for urgent production needs
The flexibility extends beyond just length. You can create separating zippers for jackets, non-separating closures for bags, or even curved applications with the right zipper type.
Why Choose Continuous Zippers Over Pre-Made Options?
Picture this: you’re in the middle of a big project, and you need a 37-inch zipper. But the store only has 36-inch and 40-inch options. Sound familiar? This is exactly why smart manufacturers and serious sewers are making the switch to continuous zippers.
The flexibility of continuous zipper rolls is honestly incredible. You’re never stuck with a zipper that’s too short or forced to pay for extra length you don’t need. Whether you’re crafting a custom-sized bag, reupholstering furniture, or creating specialized outdoor gear, you can cut exactly what your project demands.
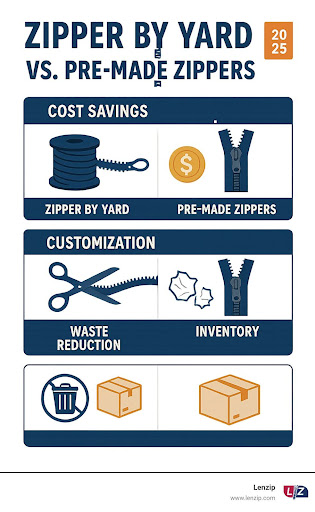
Let’s talk money for a moment. A single retail zipper might cost around $8, while the equivalent length from a continuous roll could be as low as $2. When you’re working with larger volumes or going through zippers regularly, those cost savings add up fast. It’s like buying in bulk at the grocery store – except the savings are even more dramatic.
There’s also the convenience factor. Having a spool of continuous zipper on hand means no more frantic trips to the store or waiting for specific lengths to arrive. Your production keeps moving smoothly, and inspiration doesn’t have to wait for the right supplies.
For anyone diving deeper into zipper components and terminology, our zipper terminology guide covers everything you need to know.
Key Advantages of Buying Zipper by the Yard
The beauty of zipper by yard goes far beyond just getting the right length. Less waste is probably the biggest win – both for your wallet and the environment. Instead of cutting off excess zipper and tossing it in the trash, you cut exactly what you need.
Exact length cutting means every zipper fits perfectly. No more settling for “close enough” or dealing with awkward excess hanging around. This precision gives your finished projects that professional, custom-made look.
Here’s where things get really interesting: creative freedom. Want to make a two-way zipper for a large duffel bag? Just add pulls from both directions. Need a super-long closure for a custom sleeping bag? No problem. You’re not limited by what’s sitting on store shelves.
For frequent sewers and manufacturers, continuous zippers are economical in a big way. A 50-yard spool of #3 coil zipper runs around $43 – that’s incredible value when you break it down per project. Plus, you’re always stocked and ready for whatever comes next.
Common Projects That Use Continuous Zippers
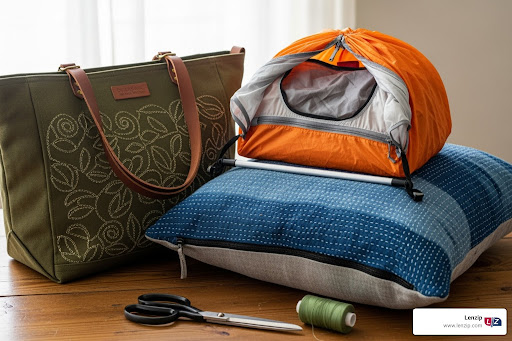
Handbags and purses are where continuous zippers really shine. Bag makers love being able to customize zipper lengths for main compartments, interior pockets, and those stylish two-way closures on larger bags.
Upholstery and home decor projects benefit hugely from exact-fit zippers. Whether you’re making cushion covers for an oddly-sized sofa or custom pillow shams, getting that perfect length makes all the difference in the finished look.
Outdoor and marine equipment often demands specific lengths and heavy-duty performance. Tents, boat covers, and specialized gear need zippers that can handle the elements while fitting exactly right. Custom garments also benefit, especially for unique designs or when replacing a broken zipper on a favorite piece.
Sleeping bags are perfect examples of where continuous zippers excel – they often need very long closures that wrap around multiple sides. Instead of trying to piece together standard lengths, you get one smooth, continuous closure that works perfectly.
The Ultimate Guide to Choosing and Using Zipper by the Yard
Selecting the perfect zipper by yard doesn’t have to be overwhelming – think of it as matching the right tool to the job. The key is understanding your project requirements, considering the fabric weight you’re working with, and thinking about the durability needs and aesthetic choices that will make your finished product shine.
A delicate silk blouse obviously needs a different approach than a heavy canvas tent. That’s where understanding the different types and characteristics of continuous zippers becomes your secret weapon. Whether you’re working with lightweight fabrics or industrial-grade materials, there’s a zipper type that’s perfect for your specific application.
For additional insights into materials and their properties, especially when it comes to textiles and hardware, our information on webbing might provide some helpful context.
Understanding Different Types of Zipper by the Yard
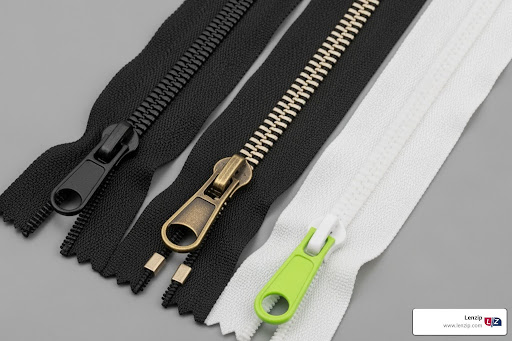
When you’re shopping for zipper by yard, you’ll encounter several distinct types, each engineered for specific applications and performance requirements.
Coil zippers are the workhorses of the zipper world, featuring spiraled nylon elements that interlock smoothly. These nylon coil zippers offer incredible flexibility and durability while remaining surprisingly easy to sew. What’s really neat is that they can even mimic the look of metal with their shiny appearance, giving you that premium aesthetic without the weight. The color options are practically endless – from classic neutrals to vibrant rainbow patterns and sophisticated black-on-black designs.
Metal zippers bring that classic, robust feel that’s perfect when you need serious strength. Made from brass, aluminum, or nickel teeth, these are the champions of heavy-duty applications. They’re particularly popular in the jeans industry because they can handle rough use day after day. The metallic finishes create bold looks that make a real fashion statement. Just keep in mind that metal zippers work best in straight applications – they’re not ideal for curving applications where uneven force might cause problems.
Plastic-molded zippers, often called Vislon zippers, feature individual molded plastic teeth that are injected directly onto the zipper tape. They’re lighter than metal options and naturally resist corrosion, making them fantastic for marine environments or outdoor gear. The durability is impressive, and they come in a wide array of colors to match any design vision.
Waterproof zippers like Aquaguard are the specialists of the bunch. These feature coated tapes or unique tooth designs specifically engineered to repel water. When moisture protection is absolutely critical – think rain jackets, diving gear, or boat covers – these zippers are non-negotiable.
Here’s how these different types stack up for various applications:
Zipper Type | Material Composition | Key Characteristics | Typical Applications |
Coil (Nylon) | Nylon coil teeth, polyester tape | Flexible, lightweight, durable, easy to sew, wide color range, can mimic metal look | Apparel, bags, purses, pockets, general purpose |
Metal | Brass, aluminum, or nickel teeth; cotton or polyester tape | Strong, heavy-duty, classic aesthetic, durable for rough use | Jeans, heavy bags, jackets, leather goods, boots |
Plastic (Vislon) | Molded plastic teeth, polyester tape | Corrosion-resistant, durable, often chunky, wide color range, good for outdoor use | Jackets, sportswear, outdoor gear, luggage, marine |
The beauty of buying zipper by yard is that you can experiment with different types for different sections of the same project, creating exactly the functionality and look you want.
Decoding Zipper Sizes and Finishes
Understanding zipper sizes is like learning a simple code that open ups perfect compatibility. The number you see – like #3, #5, #8, or #10 – tells you the width of the teeth when the zipper is closed. Think of it as a strength and visibility scale: higher numbers mean wider, stronger teeth.
#3 zippers are the delicate performers with their 3mm coil width. They’re perfect when you want the closure to practically disappear into your project. These work beautifully for inner pockets, small pouches, and neat garments like skirts and dresses where subtlety is key.
Moving up to #4.5 zippers, you get a bit more presence and strength while maintaining that refined look. These hit the sweet spot for purses, cases, and various apparel applications where you need reliability without bulk.
#5 zippers are the goldilocks of the zipper world – not too heavy, not too light, but just right for most projects. With their 5mm coil width and typically 1″ to 1¼” tape width, they’re incredibly versatile. You’ll find these on everything from backpack main compartments to jacket fronts and outdoor gear.
When you need serious strength, #8 zippers step up to handle luggage, larger bags, and tents. These are built for applications where the zipper gets frequent use and needs to hold up under stress.
#10 zippers are the heavy hitters, designed for the most demanding applications. Think boat covers, heavy industrial equipment, and large tents where failure isn’t an option.
The finish of your zipper can completely transform the look of your finished piece. Nickel gives you that bright, silvery classic look that works with almost everything. Brass brings warmth with its golden tone – perfect for leather goods and vintage-inspired pieces. Gunmetal offers a sleek, modern dark grey that’s particularly popular in contemporary designs.
For something special, antique brass provides that aged, rustic charm, while rose gold adds an neat, trendy touch. And don’t overlook the tape itself – it comes in an incredible rainbow of colors and even patterns like metallics and stripes, letting your zipper blend seamlessly or stand out as a decorative feature.
The key is matching your size and finish choices to both the functional demands and the aesthetic vision of your project. With zipper by yard, you have the freedom to get exactly what you need, when you need it.
How to Install Your Continuous Zipper Perfectly
Now comes the exciting part – changing your zipper by yard into a perfectly functioning closure! Don’t let the process intimidate you. With the right tools and a bit of patience, you’ll be installing zippers like a pro in no time.
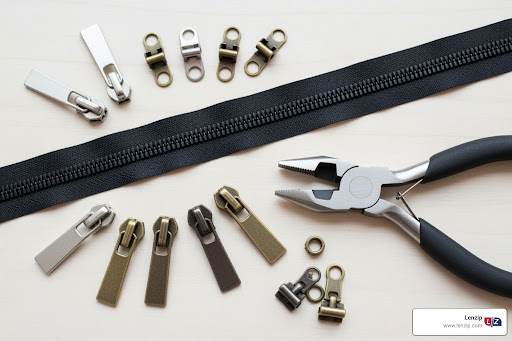
Before we dive in, let’s gather your tools. You’ll need your continuous zipper chain, sharp scissors for cutting, the appropriate slider for your zipper size, top and bottom stops, and a good pair of pliers for crimping those stops securely in place.
Start by measuring and cutting your tape to the exact length needed for your project. Here’s a pro tip: always cut slightly longer than you think you need. It’s much easier to trim excess length than to start over with a too-short zipper! Use sharp scissors to make a clean cut across both the tape and the zipper elements.
Attaching the slider is where the magic happens. This step might feel tricky at first, but once you get the hang of it, it becomes second nature. The most straightforward method involves opening one end of your zipper tape slightly. Slide one side of the tape into one opening of the slider, then carefully guide the other side into the opposite opening. Hold everything firmly and pull the slider down to engage the teeth. You might need a couple of tries to get both sides aligned properly – that’s completely normal!
If you’re struggling with the standard method, try the fork method. This technique works especially well when you have an extra pair of hands or can secure the slider in place. Separate your zipper tape ends and have someone hold the slider steady. Insert one side of the tape into its channel, then carefully align and insert the other side. Once both sides are securely positioned, pull the slider down to test the connection.
Installing your stops is crucial for preventing the slider from escaping. For the bottom of non-separating zippers, you can crimp metal bottom stops using your pliers, or create a fabric stop by sewing multiple times across the tape – this creates what we call a bartack. At the top, crimp metal top stops on each side of the tape, positioning them just above where the slider will rest when fully closed.
Sewing your finished zipper into your project is the final step. Follow your pattern instructions carefully, ensuring the zipper sits centered and straight. Take your time here – a well-installed zipper makes all the difference in your finished product’s professional appearance.
If you’re more of a visual learner, we highly recommend checking out helpful video tutorials that demonstrate these techniques step by step.
All About Sliders, Pulls, and Stops
Understanding the hardware that makes your zipper by yard function is essential for successful installation. When you purchase continuous zipper, these components are sold separately, giving you complete control over both function and aesthetics.
Zipper pulls are the small tabs attached to sliders that make gripping and moving the zipper possible. They range from simple, utilitarian designs to elaborate decorative elements that can become focal points of your finished project. The choice depends entirely on your project’s style and functional requirements.
Single pull sliders feature one tab and move in one direction, perfect for pockets, simple bag openings, or any application where the zipper only needs to open from one end. Double pull sliders, on the other hand, have two tabs – one on each side of the slider. This design creates the versatility of two-way zippers, allowing opening and closing from either end. They’re absolutely perfect for duffel bags, sleeping bags, or large covers that need multiple access points.
Many sliders include auto-locking mechanisms that keep the slider in position unless the pull tab is lifted. This feature prevents accidental opening and adds security to garments and bags where you don’t want surprise spills or exposure.
Size compatibility is absolutely critical when selecting sliders for your continuous zipper. A #5 slider will only work with #5 zipper tape – no exceptions! A #3 slider simply won’t fit a #5 zipper, and forcing incompatible sizes will damage both components. Always double-check that your slider matches your zipper size before starting installation.
Top and bottom stops are the unsung heroes of zipper function. These small metal components (or sewn bartacks) prevent your slider from traveling off the ends of your zipper chain. Bottom stops create the closed end for non-separating zippers, while top stops ensure the slider doesn’t overshoot and fall off the top.
At Lenzip, our 80 years of manufacturing experience has taught us that every component matters. Quality hardware paired with quality zipper chain creates closures that last. You can learn more about our commitment to excellence on our about us page.
Care Instructions for Longevity
Proper care ensures your zippers perform beautifully for years to come. Different zipper materials have slightly different needs, but the fundamentals remain consistent across all types.
Cleaning your zippers depends on their material composition. Nylon coil and plastic zippers respond well to gentle cleaning with a damp cloth and mild soap. Avoid harsh chemicals that could degrade the plastic or nylon elements. For metal zippers, use a soft brush with mild soap and water to remove dirt and grime. Metal zippers can sometimes experience fabric dye transfer during post-treatment processes, causing discoloration. If tarnishing occurs, specialized metal cleaners can help, but keep them away from the fabric tape and dry thoroughly afterward to prevent rust.
Lubrication can work wonders for stiff or sticky zippers. For nylon and plastic versions, try a silicone-based spray or even run a graphite pencil along the teeth. Metal zippers benefit from dry lubricants designed specifically for zippers or the graphite pencil trick. Avoid oily lubricants that attract dirt and debris.
Proper storage of your zipper by yard spools protects your investment. Keep them in a cool, dry place away from direct sunlight, which can degrade the tape and make teeth brittle or discolored. Storing spools in their original packaging or sealed bags provides additional protection from dust and moisture.
Preventing damage during sewing and use starts with proper technique. Always use a zipper foot when sewing, and never sew directly through zipper teeth – especially metal ones, which can break needles and damage your zipper. For heavy materials, use appropriate needles like jeans/denim needles for canvas, paired with strong polyester or nylon thread.
During use, encourage pulling sliders straight without yanking or twisting motions. Metal zippers cannot be used in curving applications, as this creates uneven stress on the teeth and can cause malfunction. With proper care and handling, your zippers will provide reliable service throughout the life of your projects.
Frequently Asked Questions about Continuous Zippers
We get tons of questions about zipper by yard from manufacturers, crafters, and everyone in between. After 80 years in the business, we’ve heard just about everything! Let’s tackle the most common questions that pop up when people are getting started with continuous zippers.
What’s the difference between “zipper by the yard” and “continuous zipper”?
Here’s the thing that trips up a lot of folks: these terms mean exactly the same thing! Whether someone says “zipper by the yard,” “continuous zipper,” or “zipper chain,” they’re all talking about that beautiful spool of zipper material without any sliders or stops attached.
Think of it like buying fabric by the yard versus buying a finished shirt. The continuous zipper is your raw material – just the interlocking teeth and tape, ready for you to customize. You cut what you need, add your own slider and stops, and voilà! It’s the opposite of those pre-made zippers you see hanging in craft stores that come with everything already attached in fixed lengths.
The “chain” part of “zipper chain” makes perfect sense when you see it – those teeth really do look like a chain running down both sides of the tape. No mystery there, just straightforward terminology that describes exactly what you’re getting.
Can I use any zipper pull with any zipper tape?
Oh boy, this is where we see people run into trouble! The short answer is absolutely not, and here’s why: size compatibility is everything.
That number on your zipper – whether it’s #3, #5, #8, or #10 – isn’t just a suggestion. A #5 slider will only work with #5 zipper by yard tape. Try to force a #3 slider onto #5 tape, and you’ll be there all day getting frustrated. It’s like trying to put a size 8 shoe on a size 10 foot – it’s just not happening!
Brand compatibility usually isn’t a huge issue if you stick to the same size numbers. Most manufacturers follow the same standards, so a #5 coil slider from one company will generally work fine with #5 coil tape from another. But here’s where it gets interesting: coil, metal, and plastic sliders are designed specifically for their matching zipper types.
You wouldn’t put a metal zipper slider on nylon coil tape – they’re engineered differently. The coil sliders have channels shaped for those spiral teeth, while metal sliders are built to handle the straight-edged metal teeth. Using the right combination ensures your zipper works smoothly for years instead of jamming up after a few uses.
How do I finish the ends of a zipper I cut from a roll?
This is probably the most practical question we get, and honestly, it’s where the magic happens! Once you’ve cut your perfect length from your zipper by yard roll, you need to make sure that slider stays put and your zipper looks professional.
Metal stops are the gold standard here. These little metal pieces crimp right onto your zipper tape using zipper pliers. For a closed-end zipper like you’d use on a bag, you’ll add a bottom stop where the two sides meet. For the top, you’ll crimp on two top stops – one on each side of the tape – to keep that slider from flying off the end.
Fabric stops give you a softer, more subtle finish that’s perfect when you want the zipper to blend in. You’re essentially creating little fabric tabs that act as barriers for the slider. This technique works beautifully on garments where you don’t want the hardware to be the star of the show.
Sewing across the tape – what we call “bartacking” – is probably the simplest method, especially for beginners. Just run several lines of tight, strong stitches across the zipper tape at both ends. It creates an incredibly strong barrier that no slider is getting past. This works particularly well at the bottom of non-separating zippers, and you can make it look quite neat with the right thread color.
The method you choose really depends on your project and how you want it to look. A heavy-duty marine cover might call for robust metal stops, while a delicate evening bag might be better served with subtle fabric stops.
Conclusion
What a journey we’ve taken together through zipper by yard! If you’ve made it this far, you’re now armed with everything you need to transform how you approach zipper projects.
Think about it – no more settling for “close enough” lengths or paying premium prices for individual zippers. You now understand how continuous zipper chain puts you in the driver’s seat, whether you’re manufacturing hundreds of bags or crafting that perfect custom piece.
We’ve covered a lot of ground here. You’ve learned the key differences between coil, metal, and plastic zippers, figured out how to decode those mysterious size numbers, and mastered the art of installing sliders and stops. More importantly, you’ve finded how zipper by yard can slash your costs while giving you creative freedom that pre-made zippers simply can’t match.
The beauty of continuous zipper really shines when you realize you’re not just buying a product – you’re investing in flexibility. That moment when you can cut exactly 37 inches for a custom bag, or create a two-way zipper for a specialty application, makes all the difference between amateur and professional results.
Your projects deserve better than compromise. Whether you’re working on heavy-duty marine covers, precision upholstery, or custom outdoor gear, having the right zipper in the exact length you need lifts everything you create.
At Lenzip, we’ve spent 80 years perfecting the art of zipper manufacturing right here in Rolling Meadows, Illinois. When you choose our American-made industrial and commercial zippers, you’re choosing unparalleled quality, integrity, and the kind of reliable on-time delivery that keeps your projects moving forward.
Ready to experience the zipper by yard difference for yourself? View our full range of products and find why serious manufacturers and crafters trust Lenzip for their most demanding projects. Your next creation is waiting – and now you have exactly what it takes to make it perfect.