Smooth Sailing:
How to Iron Zippers for Perfect Projects
Unlock the secret to flat zippers! Learn essential ironing techniques for all types, plus how to apply easy iron on zippers.
How to Iron Zippers for Perfect Projects
Iron on zippers come in two forms: traditional zippers that need ironing before installation, and specialized adhesive zippers that attach using heat.
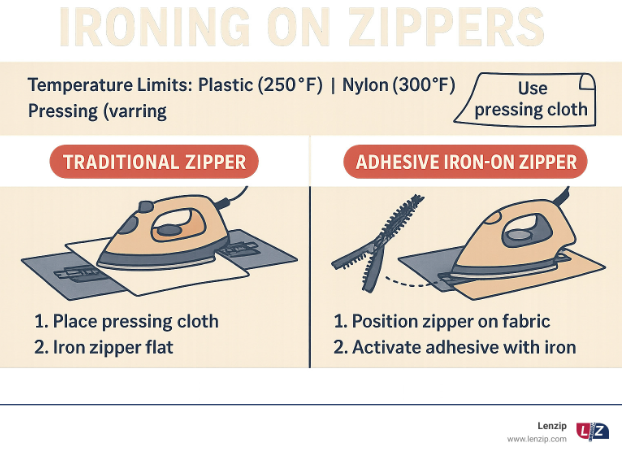
Quick Reference for Iron on Zippers:
- Traditional zippers: Iron flat before sewing to prevent puckering and ensure smooth operation
- Adhesive iron-on zippers: Apply directly to fabric using heat activation – no sewing required
- Temperature limits: Plastic (250°F), Nylon (300°F), Metal (varies by coating)
- Always use: Pressing cloth to prevent damage to zipper teeth and tape
As one frustrated sewer shared in online forums: “Tutorials all say to iron zip flat, but I’ve never been able to get zip actually flat – think might be too concerned about melting zip.” This fear is common, but unnecessary when you know the right techniques.
The difference between a professional-looking finished product and an amateur one often comes down to preparation. Puckered seams around zippers are the telltale sign of skipped ironing steps. Whether you’re working with traditional sewn-in zippers or modern adhesive varieties, heat application is critical for achieving that flat, smooth finish your customers expect.
For manufacturers dealing with high-volume production, understanding these ironing fundamentals prevents costly rework and maintains the quality standards that separate premium products from budget alternatives.
Before You Iron: Essential Prep and Tool Checklist
Getting ready to iron your zipper properly is a precision task—having the right tools and knowledge makes the difference between a professional result and a mishap.
Let’s start with your iron setup. You’ll need a quality iron with adjustable temperature settings (this isn’t negotiable), a stable ironing board, and most importantly, a pressing cloth. That thin cotton cloth or clean pillowcase might seem like an extra step, but it’s your insurance policy against melted zipper teeth and shiny fabric marks.
Now comes the crucial part: understanding what you’re working with. Iron on zippers and their materials have very different heat tolerances, and knowing these limits prevents those heart-sinking moments when a zipper melts under your iron.
Nylon coil zippers are the workhorses of the zipper world – flexible, lightweight, and found in most garments. They can handle temperatures up to about 300°F, making them fairly forgiving for most ironing tasks. These smooth, continuous coils respond beautifully to proper heat pressing.
Plastic molded zippers require more caution. Those individual plastic teeth you see on bags and outerwear start getting unhappy around 250°F. Push beyond that, and you’ll watch your zipper transform into a wavy mess that’s only good for the trash bin.
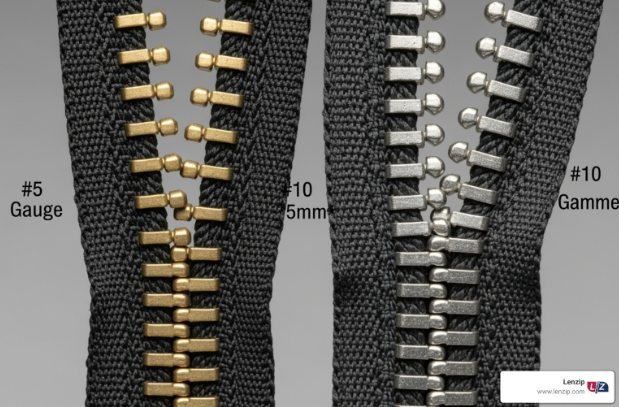
Metal zippers present their own challenges. While the metal teeth themselves won’t melt, the tape backing and any surface coatings can still suffer heat damage. Plus, there’s always the risk of color transfer from the metal onto your fabric – something we’ll address with protective techniques.
The fabric you’re working with matters just as much as the zipper material. Cotton and denim are heat-friendly partners that work well with most zipper types. Delicate fabrics like silk or synthetic blends need gentler treatment, often requiring you to work at the fabric’s temperature limit rather than the zipper’s.
Interfacing becomes your secret weapon when working with softer fabrics or adding zippered details like pockets. This fusible backing prevents stretching and puckering, giving your project that crisp, professional structure.
These are starting points, not rigid rules. Every fabric and zipper combination is unique, which is why testing on scraps saves both time and materials. When in doubt, start cooler and work your way up.
For a deeper understanding of zipper construction and terminology, check out more on zipper types and parts to build your expertise.
With your tools ready and material knowledge solid, you’re prepared to tackle the actual ironing process with confidence rather than crossed fingers.
How to Iron Zippers for a Flawless Sewing Application
Now that we’re equipped, let’s dive into zipper preparation: ironing for sewing. This isn’t just about smoothing wrinkles—we’re preparing the zipper tape to lie flat and blend seamlessly with your fabric. This crucial step often separates a homemade look from professional results.
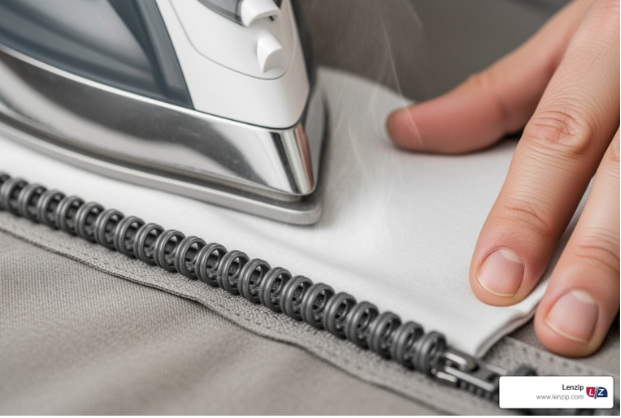
Let’s walk through the proper technique step by step. First, close the zipper completely – this keeps the teeth perfectly aligned and prevents any distortion during the ironing process. Next, check that the zipper puller is lying flat against the tape. If it’s creating a bulky area, gently move it to a less obstructive position or work carefully around it.
Position your fabric with the zipper on the ironing board, making sure the zipper tape faces up. Here’s where many people make their first mistake: they skip the pressing cloth. Never iron directly on the zipper! Always place a clean, dry pressing cloth over the entire zipper and surrounding fabric. This simple barrier protects against melting, prevents shine marks, and saves you from heartbreak later.
Now comes the technique that separates the pros from the beginners: press, don’t glide. Instead of sliding the iron back and forth like you would with regular fabric, use firm but gentle pressing motions. Place the iron down, hold for just a few seconds, then lift and move to the next section. This controlled approach prevents overheating and gives you much better results.
Timing matters here. Keep each pressing interval under 5 seconds to avoid overheating the materials. After pressing each section, lift the pressing cloth and let the zipper and fabric cool completely before handling. This cooling period helps set the shape and prevents new wrinkles from forming.
Your goal is flattening the zipper tape and removing kinks or waves – not pressing the teeth themselves. Direct heat on nylon or plastic teeth will soften, deform, or completely melt them, turning your zipper into expensive trash.
Ironing an Invisible Zipper
Invisible zippers are brilliant when installed correctly, but they arrive with their coils curled inward under the tape. This design feature that makes them “invisible” also makes them trickier to iron properly.
The main challenge is uncurling those coils so you can stitch as close as possible to the teeth. Don’t stress about making them perfectly flat – a gentle uncurl is usually sufficient, especially since your invisible zipper foot will help guide everything into place during sewing.
Start with a low heat setting since invisible zippers are typically made from heat-sensitive nylon. Place your pressing cloth over the zipper and gently press to either side of the zipper teeth, avoiding direct pressure on the coils themselves. Some sewers find a light spray of water helps with flattening, but test this on a scrap first.
Here’s a little secret from experienced sewers: you can also use a finger pressing technique. Gently open the coils with your fingers as you sew, which sometimes works better than extensive pre-ironing. When you do use an invisible zipper foot, it’s designed to glide over the coils, allowing your needle to get incredibly close to the teeth and often making heavy-duty ironing less critical.
For more detailed guidance on different installation methods, check out A guide to installing different zipper styles.
Special Considerations for Metal Zippers
Metal zippers bring durability and style to any project, but they need special attention during ironing. While the metal teeth won’t melt like plastic ones, you can still cause significant damage if you’re not careful.
The biggest concern is protecting the surface coating and protective layer on metal zippers. Direct high heat can damage these finishes, leading to dullness, chipping, or even corrosion over time. Always use that pressing cloth, and avoid pressing directly on the teeth, slider, or other metal components with excessive force.
Here’s something that catches many people off guard: color transfer risk. Dark-colored metal zippers can transfer color to light fabrics when heated. The metal’s oxidation layer can leave marks on your beautiful light-colored fabric. To prevent this disaster, place a piece of paper or clean cloth between the zipper and fabric (under the zipper tape, not just over it) before ironing.
If you’re working with a garment that might still be damp, make sure everything dries thoroughly after ironing. This helps prevent discoloration of the metal components.
One final note: if you’re working with specialty decorative metal zippers that create metallic effects through special plating, never iron the elements directly. These specialty finishes require extra care to maintain their unique appearance. When in doubt, test on a scrap piece first – it’s always better to be safe than sorry.
A Crafter’s Guide to Applying Iron On Zippers
Here’s where things get really exciting! When we talk about iron on zippers, we’re not just discussing the prep work for sewing. There’s a whole other world of zippers that come with their own special superpower: heat-activated adhesive already built right into their tape.
These clever little inventions are absolute lifesavers when you need a quick fix or want to add some functional flair without threading a single needle. Think of them as the instant coffee of the zipper world – not always the choice for heavy-duty commercial applications, but perfect when you need results fast.
What makes true iron on zippers special? They come with heat-sensitive glue pre-applied to the back of their fabric tape. When you press your iron down, that adhesive melts and creates a strong bond with your fabric. No sewing machine required, no fumbling with pins, no cursing at tangled thread.
The beauty of these no-sew application wonders extends far beyond convenience. They’re fantastic for quick repairs – like when your kid’s backpack gets a tear and you need it fixed before tomorrow’s field trip. They work brilliantly as decorative patches that actually do something useful, unlike those purely ornamental ones that just sit there looking pretty.
Want to add pockets to a plain jacket or create instant storage on a tote bag? Iron on zippers have got you covered. They’re also perfect for crafts where traditional sewing might be overkill or simply not practical.
How to Apply True Iron On Zippers
Getting a perfect bond with iron on zippers is all about following the process step by step. Rush it, and you’ll end up with edges that lift and a zipper that might give up on you at the worst possible moment.
Start by pre-washing your fabric. This isn’t just good housekeeping – it removes any factory finishes that could interfere with the adhesive and prevents future shrinkage that would make your perfectly applied zipper look puckered and sad.
Placement is everything here. Take your time positioning the zipper exactly where you want it. Once that adhesive sets, you’re committed. Use a few pins outside the adhesive area if you need to keep things steady while you work.
Check the product instructions for the right heat setting. Most iron on zippers need medium-high heat, and here’s the important part: no steam. That extra moisture can actually weaken the bond you’re trying to create.
When it comes to pressing time, think firm and steady, not quick and light. Place your pressing cloth over the zipper and press down for the recommended time – usually somewhere between 10 to 30 seconds per section. Don’t glide the iron around; lift it up and move to the next spot.
The cooling period is where the magic really happens. That adhesive forms its strongest bond as it cools down, so resist the urge to poke and prod. Let it sit undisturbed for several minutes before you test the edges.
Best Projects for Iron On Zippers
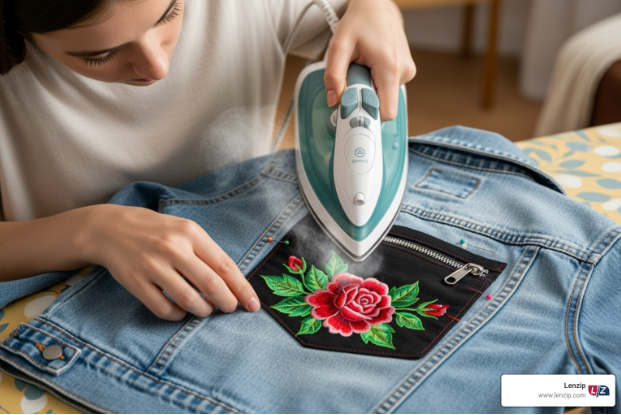
The versatility of iron on zippers makes them perfect for so many creative solutions. Mending tears becomes almost fun when you can turn a rip into a cool design feature. That small tear in a jacket? Cover it with a decorative iron on zipper and suddenly it looks intentional.
Embellishing bags is another fantastic use. A plain canvas tote can become something special with a well-placed zipper that creates both style and function. Customizing jackets opens up endless possibilities – add zippers to sleeves, create fake pocket details, or turn a boring piece into something uniquely yours.
For kids’ crafts, these zippers are absolutely perfect. No sharp needles, no complex techniques, just heat and creativity. Children can make their own pencil cases, decorate fabric bags, or create simple pouches for their treasures.
The ability to create instant pockets might be the most practical benefit of all. Whether you’re adding external storage to a work shirt or creating a secure spot for your phone on a gym bag, iron on zippers make it possible in minutes instead of hours.
While these adhesive zippers are incredibly convenient for personal projects and quick fixes, it’s worth noting that for commercial and industrial applications requiring extreme durability, traditionally sewn zippers remain the gold standard for long-term reliability.
Troubleshooting Common Ironing Mishaps
We’ve all had that heart-sinking moment when ironing goes wrong. One second you’re confidently pressing away, and the next you’re staring at a melted mess or a mysterious stain. Don’t worry – even experienced sewers and manufacturers have been there! The good news is that most zipper ironing disasters are preventable, and understanding what went wrong helps you avoid repeating the same mistakes.
Let’s walk through the most common mishaps you might encounter and how to handle them like a pro.
Melted teeth and warped tape are the nightmare scenarios that keep sewers up at night, especially when working with plastic and nylon zippers. This happens when your iron runs too hot or you hold it in one spot too long. The teeth literally melt together, turning your perfectly good zipper into expensive trash. Unfortunately, there’s no coming back from this one – you’ll need to replace the entire zipper.
The best defense? Always use that pressing cloth we keep talking about, stick to the recommended temperatures (130°C for plastic, 150°C for nylon), and keep your pressing intervals under five seconds. Think of it as zipper CPR – short, controlled bursts work better than long, sustained pressure.
Zipper shrinkage is another sneaky problem that catches people off guard. Synthetic zipper tapes can shrink when they get too hot, causing the whole zipper to pucker and pull at your fabric. This creates those telltale waves and bumps that scream “amateur hour.”
To prevent shrinkage, use appropriate heat settings and let everything cool completely between presses. This cooling period isn’t just downtime – it’s when the zipper tape sets into its new, flatter shape. Also, make sure your fabric is pre-washed and preshrunk so everything shrinks at the same rate.
Fabric staining is particularly frustrating because it often shows up on light-colored fabrics paired with dark metal zippers. The metal can transfer color or leave oxidation marks, especially when heat is involved. Nobody wants mysterious dark smudges on their cream-colored jacket!
The solution is simple: create a barrier. Place a piece of paper or an extra cloth layer between the metal zipper and your fabric before ironing. Make sure the zipper is completely dry first – moisture can make staining worse. If you do get a stain, try a fabric stain remover immediately, but prevention is always easier than cleanup.
Metal zippers can also suffer from peeling finishes and damaged coatings when exposed to direct high heat. That beautiful brass or gunmetal finish can turn dull, chip, or peel away entirely. Once again, your trusty pressing cloth comes to the rescue. Use it religiously, and avoid pressing down hard directly on the metal elements.
Puckering fabric around the zipper is often blamed on installation technique, but it frequently starts with poor ironing preparation. If the zipper tape isn’t properly flattened before sewing, or if your fabric stretches during the ironing process, you’ll end up with those annoying ripples and waves.
The fix involves thorough preparation. Iron that zipper tape completely flat using our recommended techniques. For stretchy or delicate fabrics, consider adding lightweight interfacing to stabilize the zipper area. Taking time to baste the zipper in place by hand before final stitching can also prevent shifting and puckering.
Distorted plastic pullers and sliders happen when the iron accidentally touches these components directly. The plastic warps or melts, making the zipper difficult or impossible to operate. Always position the puller flat or move it out of the way before ironing. If you must iron nearby, use extreme caution and keep that pressing cloth in place.
Here’s the golden rule for avoiding most of these problems: test on a scrap piece first. If you have leftover fabric and zipper material, do a practice run. It’s much better to ruin a test piece than your entire project. Start with lower temperatures and work your way up if needed.
Temperature control is your best friend here. Double-check your iron’s setting before you start, and remember that different materials have different tolerance levels. When in doubt, go lower and slower.
Most importantly, don’t rush the process. We know you’re excited to see your finished project, but patience during the ironing stage prevents heartbreak later. Take your time with each section, use proper technique, and your iron on zippers – whether traditional or adhesive types – will reward you with professional-looking results.
By understanding these common pitfalls and applying the techniques we’ve covered, you’ll join the ranks of confident zipper ironists who rarely encounter these problems. And when you do hit a snag, you’ll know exactly how to troubleshoot your way back to success.
Can I iron directly on plastic or nylon zipper teeth?
Absolutely not! We can’t stress this enough – direct heat on plastic or nylon teeth is asking for trouble.
Here’s the thing: plastic and nylon are synthetic materials with pretty low melting points. Plastic zippers start getting soft around 266°F (130°C), while nylon can handle up to about 302°F (150°F). That might sound hot, but your iron can easily reach those temperatures and beyond.
When plastic or nylon teeth meet direct heat, bad things happen fast. They can melt completely, turning your zipper into a useless mess. Even if they don’t fully melt, they might warp or shrink, making the slider stick or creating gaps in the closure. We’ve seen zippers ruined in seconds this way.
The solution is simple: always use a pressing cloth. This thin barrier spreads out the heat and protects those delicate teeth while still letting you flatten the tape. It’s such a small step that prevents such big headaches.
Frequently Asked Questions About Ironing Zippers
We get a lot of questions about the ins and outs of ironing zippers, and honestly, we love talking about this stuff! The confusion often starts with the term “iron on zippers” itself – it can mean different things depending on what you’re working on. Let’s clear up the most common questions we hear.
What’s the difference between ironing a standard zipper and using iron on zippers?
This question comes up all the time, and for good reason! The confusion stems from how we use the term “iron on zippers” in two completely different ways.
When you’re ironing a standard zipper (like the high-quality ones we make here at Lenzip), you’re doing prep work before sewing. Think of it as getting your zipper ready for its big moment. You’re flattening out the fabric tape, smoothing away any creases, and making sure everything lies perfectly flat against your garment. The iron is just helping you prepare – the real attachment happens when you sew it in place. These zippers are built to last decades with proper installation.
True iron on zippers are a completely different animal. They come with heat-activated adhesive already on the back of the tape. Here, the iron isn’t just prep work – it’s doing the actual attaching. You position the zipper, apply heat, and boom – it’s stuck to your fabric. No sewing machine required!
While these adhesive zippers are super convenient for quick fixes or craft projects, they won’t give you the same rock-solid durability you get from a properly sewn-in zipper. For anything that needs to stand up to heavy use or frequent washing, a traditional sewn-in approach is still your best bet.
How do I prevent a metal zipper from staining my fabric when ironing?
Metal zippers can be tricky when it comes to staining, especially if you’re working with light-colored fabrics. The culprit is usually oxidation from the metal or residue from protective coatings that can transfer under heat.
Start with a pressing cloth – this is your first line of defense for any zipper, but it’s especially important with metal ones. But for extra protection with dark metal zippers on light fabrics, we recommend adding a paper barrier underneath. Just slip a clean piece of parchment paper or even a brown paper bag between the zipper and your fabric, then put your pressing cloth on top.
Make sure everything is bone dry before you start ironing. Any moisture can make staining more likely. Our experience shows that letting metal zippers dry completely after ironing helps prevent discoloration too.
Don’t press too hard – firm pressure is good, but you don’t want to force any metal residue into your fabric fibers. And as always, test on a scrap first if you’re worried about a particular combination of zipper and fabric.
These simple steps will keep your light fabrics looking pristine while still getting that perfectly pressed zipper you’re after.
Conclusion
Whether you’re smoothing out a traditional zipper before installation or applying one of those handy iron on zippers for a quick repair, proper heat application truly makes all the difference between amateur and professional results.
Think about it – we’ve all seen those telltale puckered seams that scream “homemade project gone wrong.” But now you know the secret: it’s not about expensive tools or years of experience. It’s about understanding your materials and respecting the simple rules of temperature control, pressing cloths, and patience.
The beauty of mastering zipper ironing lies in the details. Knowing that plastic zippers need gentle treatment at 266°F, while nylon can handle a bit more heat at 302°F, transforms you from someone who’s “too concerned about melting the zip” (as that frustrated sewer we mentioned earlier) into someone who confidently creates smooth, flat installations every time.
Whether you’re working with traditional sewn-in zippers or experimenting with the convenience of iron on zippers for decorative patches and quick fixes, material knowledge truly is your foundation for success. That pressing cloth isn’t just a suggestion – it’s your insurance policy against melted teeth, warped tape, and stained fabric.
At Lenzip, we’ve spent 80 years perfecting the art of zipper manufacturing because we understand that quality starts with the product itself and extends all the way through to proper installation techniques. Our American-made zippers are designed to withstand proper ironing and deliver the smooth operation and durability that separates premium products from budget alternatives.
Ready to put these techniques to work? Explore our high-quality American-made zipper Products for your next project and experience what happens when meticulous craftsmanship meets proper installation technique.
Your Partner in Production
We understand that every project is unique, which is why we offer the flexibility you need. Our B2B focus means we can support your business with options that work for you, including minimums as low as 25 units. We are not just a supplier; we are your partner, committed to helping you find the right solution to fit your specific requirements.
Let’s Find the Right Solution for You
Ready to upgrade to the Lenzip standard? We’re here to help.
Talk to a representative today. We’ll help you find the right solution for your project
Call us at (847) 368-9000 or request a quote today.