Even seasoned sewers dread unpicking a crooked zipper. Few tasks test patience like discovering misaligned teeth or puckered seams after hours of stitching. Yet nearly every zipper failure—whether in fashion design, upholstery, or technical outerwear—is preventable.
For over 75 years, LenZip has supported apparel engineers, contract manufacturers, and DIY creators in sewing zippers that maintain smooth function and durability over time. Drawing on industrial testing and repair data, this guide clarifies why common zipper sewing mistakes happen and how to avoid them before they undermine product quality.
Why Proper Zipper Installation Is Critical for Performance and Durability
A zipper is a structural component, not just decoration. Each tooth or coil bears repeated stress whenever the garment flexes or closes. Incorrect installation—due to crooked alignment, skipped reinforcement, wrong needle size, or mismatched tape tension—forces these stresses unevenly and shortens the zipper’s lifespan.
Precision stitching keeps the slider moving straight and distributes load evenly across the seam. In outerwear and industrial gear, poor alignment can create functional problems like cold spots or water leaks. To learn more about zipper construction and material performance, visit Zipper Engineering 101 and Zipper Testing Standards.
A well-installed zipper closes smoothly, resists lateral pulls, and integrates seamlessly into the garment’s design—proof that craftsmanship and engineering go hand in hand.

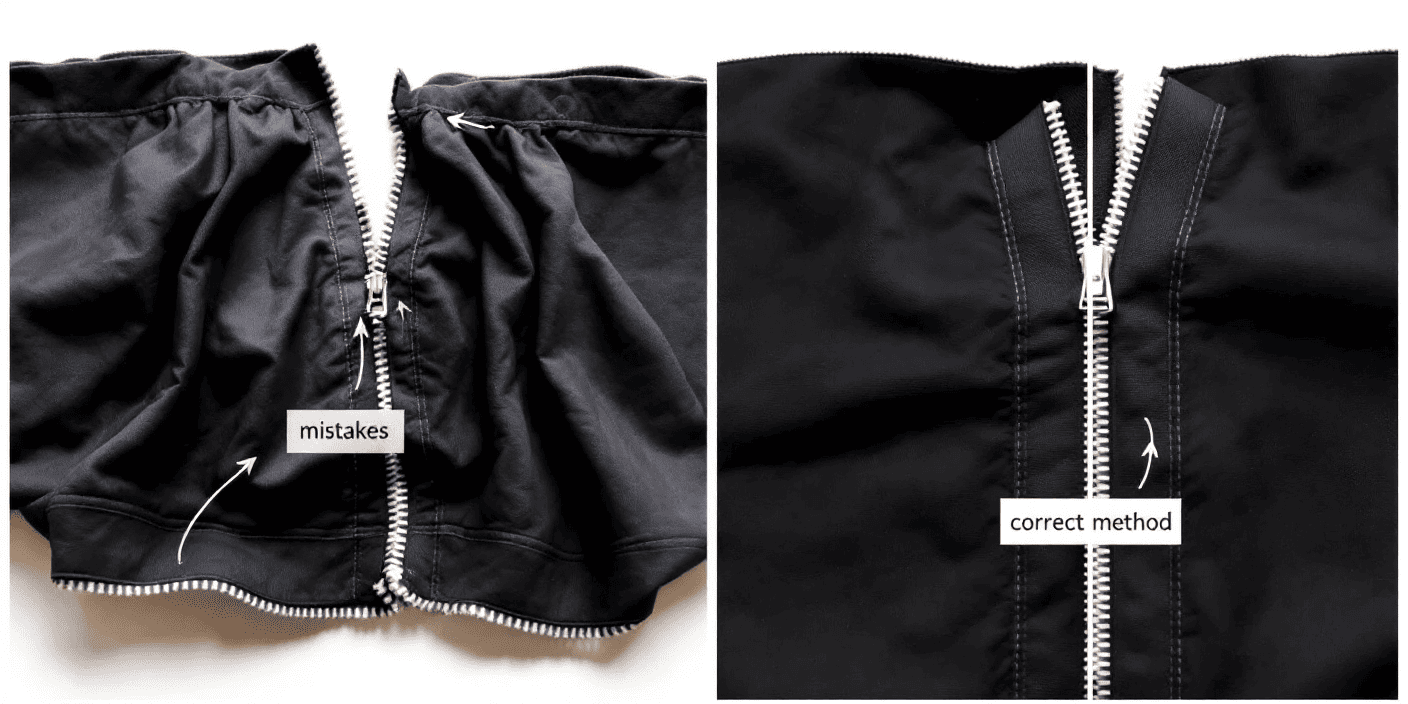
The Most Common Zipper Sewing Problems and How They Occur
Sewing a zipper incorrectly is rarely about lack of skill; more often, it’s skipped preparation or incompatible materials causing trouble.
Misaligned teeth or uneven tape placement result in one side of the zipper sitting higher, twisting the slider path. This distortion causes the chain to jam or separate under tension.
Over-stitching near the slider path restricts movement, creating friction points that damage coils or teeth. Using the wrong zipper gauge or type on heavy fabrics increases stress with every zip, leading to premature tape tearing.
Likewise, improper presser foot pressure or incorrect needle size lets fabric creep during sewing, producing visible ripples or puckers.
Skipping reinforcement at the zipper base or top stop allows sliders to burst through after limited use.
All these issues can be avoided with thorough pre-planning, correct tools, and knowledge of zipper anatomy. For a refresher, review Guide to Zipper Teeth, Sliders, and Their Parts and Zipper Terminology.
Preparing for a Professional Zipper Installation
Flawless zipper sewing begins before the first stitch. Accurately measure the opening, mark alignment notches, and verify fabric grain to ensure both sides feed evenly. Use a zipper foot for maximum visibility and maintain a consistent 1/8-inch seam allowance from the teeth.
Hand-baste or secure the zipper with washable tape to prevent shifting while sewing. When working with heavier materials, reduce machine speed for better control. Adjust upper thread tension until stitches sit flat on both layers without puckering.
To pair zippers with appropriate fabrics and materials, check out Zippers for Sewing — The Complete Beginner’s Guide.
Testing the zipper several times throughout the sewing process catches errors early and saves rework later.
Quick Zipper Sewing Checklist for Reliable Results
Measure garment openings precisely and mark notches on fabrics and zippers before sewing.
Match zipper gauge carefully with fabric thickness and flexibility.
Use an appropriate needle size and presser foot pressure to avoid fabric creep or puckering.
Secure zipper tapes via basting or washable tape prior to stitching for accurate alignment.
Maintain consistent seam allowance of about 1/8 inch from teeth to avoid stitch encroachment.
Monitor thread tension, reduce sewing speed on heavy fabrics, and test slider movement mid-process.
Choosing the Right Zipper Type and Gauge for Your Project
Using the incorrect zipper type can cause headaches during installation. Coil, molded plastic, and metal zippers behave differently under a presser foot and on various fabrics.
Coil zippers, made from interlocking nylon or polyester, are flexible and easy to sew, ideal for curved seams or lightweight textiles.
Molded plastic zippers have rigid teeth, perfect for bulkier materials like canvas or coated nylon.
Metal zippers provide the strongest closure for denim, leather, and industrial uniforms but require slower sewing speeds to protect needles.
For detailed application guidance, consult Zipper Types Explained and match strength requirements with materials at Zipper Gauge & Chain Size Chart. Also review Continuous Chain vs Finished Zippers for manufacturing applications.
Mid-Article Call to Action
If you’re unsure about which zipper or gauge fits your fabric, reach out to LenZip’s expert engineering team for custom recommendations tailored to your project’s needs. Request a Quote today to get started.
Preventing Puckering and Distortion When Sewing Zippers
Puckering usually occurs when the stitch line is tighter than the zipper tape or fabric layers, causing ripple effects.
Balancing machine tension and stitch length solves most puckering problems. Use a medium stitch length (2.5–3 mm) and always check thread tension on a test scrap before sewing.
If puckering appears, slightly reduce upper tension and press seams gently with a warm iron between passes to relax fibers. Interfacing lightweight fabrics can add stability and reduce stretching.
Some professionals lightly steam-shrink zipper tape before installation to match the fabric’s heat response—a tailoring technique widely used in technical gear manufacturing.
More advice can be found in Zipper Care Tips to Make Them Last Longer.
Repairing or Replacing a Failed Zipper: When and How
Knowing whether to repair or replace a zipper saves time and materials. If sliders slip or fail to close teeth, slider replacement may restore full function without a full zipper change.
However, torn tapes, missing teeth, or broken stops require complete zipper replacement.
Explore step-by-step guides and repair tips in How to Fix a Zipper — Diagnose, Repair or Replace. Understanding the difference between Continuous Chain and Finished Zippers also helps when working with bulk zipper stock for on-demand repairs.
Matching Thread, Tape, and Fabric for Strong Seams
Thread choice matters as much as zipper type. Polyester thread offers strength and flexibility; nylon thread is softer but stretches slightly; polypropylene thread provides chemical resistance, ideal for marine or industrial applications.
Cotton thread is generally ill-advised on synthetics, as it absorbs moisture and weakens seams. Aligning thread polymer with zipper tape polymer improves seam durability under heat and laundering.
Deepen your understanding at Polypropylene vs Polyester and Zipper Materials & Finishes.
Testing Your Finished Sewn Zipper for Quality Assurance
Quality assurance should match professional manufacturing standards. After sewing, gently pull both garment sides to check alignment and chain tension. The slider should glide easily without catching.
Manufacturers simulate wear via pull-strength and cycle tests following ASTM D2061. Learn more in Zipper Load Testing Explained and How Zippers Are Tested for Strength, Corrosion, and Fatigue.
Small-scale testing helps prevent costly field failures and warranty returns.
Sewing with Different Fabrics: Tips and Best Practices
Different fabrics call for tailored zipper selections and sewing approaches.
Lightweight synthetics benefit from narrow coil zippers in smaller gauges (#3 to #5) that preserve garment flexibility.
Heavy canvas and leather require robust molded or metal zippers in larger gauges (#8 to #10) that resist abrasion.
Stretch fabrics should incorporate stabilizing tape or interfacing to prevent puckering.
For multi-material technical apparel, LenZip’s engineers assist in matching zipper coatings to thermal or moisture barrier layers, including RF-Welded or Heat-Sealed Seams.
Sewing Environment and Zipper Maintenance Tips
Thread buildup, worn needles, and unbalanced feed dogs can distort stitching lines. Regular machine cleaning and lubrication prevent dragging, protecting zipper tapes and fibers.
Store zippers flat or loosely rolled to avoid creasing, and avoid excessive heat near plastic teeth during pressing.
See detailed preservation guidance at Zipper Maintenance and Care.
A clean workspace and sharp tools directly improve sewing consistency.
Why Professional Manufacturers Choose LenZip for Zipper Solutions
OEMs rely on LenZip for consistent tolerances, expert engineering, and responsive domestic support. Every production run undergoes automated inspections verifying pitch accuracy, slider tension, and color consistency.
LenZip’s Chicago facility maintains full traceability from yarn to finished zipper, empowering designers with data-backed confidence.
Learn more at About LenZip or request samples through Request a Quote.
Conclusion: Mastering Zipper Installation for Durable, High-Quality Closures
Every zipper seam represents the intersection of craftsmanship and mechanical precision.
A well-installed zipper enhances garment usability, comfort, and value, while a poorly sewn one diminishes all three.
By combining professional techniques with quality zippers from LenZip, sewers and manufacturers ensure garments perform as beautifully as they look.
For ongoing care advice and testing insights, explore Zipper Care Tips to Make Them Last Longer or contact LenZip’s engineering team via Request a Quote.
FAQ — Zipper Sewing Troubleshooting
Why does my zipper pucker after sewing?
Excess upper thread tension or short stitch length compresses fabric against zipper tape. Slightly reducing tension and pressing seams flat relieves puckers.
What stitch length works best for zippers?
A medium stitch length of 2.5–3 mm balances seam hold with fabric flexibility.
How can I ensure both zipper sides align evenly?
Carefully mark notches and baste before stitching. Use pins or washable basting tape to prevent fabric drift.
Can I reuse an old zipper?
Yes—if the teeth and tape remain intact. Replacing the slider often restores full function.
Which zipper type is easiest for beginners to sew?
Coil zippers are forgiving because their flexible teeth adapt well to curves and movement.
How do professionals test zipper seams?
Manual pull tests and accelerated wear cycling following ASTM D2061 confirm strength and alignment.