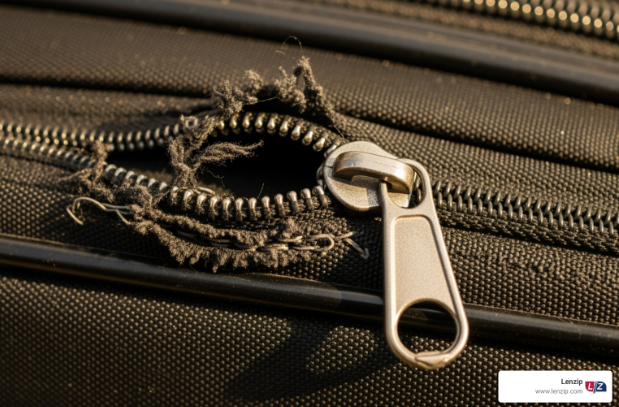
Nothing derails a trip faster than a broken luggage zipper. One moment you’re zipping up your suitcase, and the next, the slider jams or the teeth separate — leaving you scrambling before your flight. Fortunately, luggage zipper replacement is easier, faster, and more affordable than most travelers think. Whether you’re tackling a DIY fix or opting for professional repair, understanding how zippers work can save you time, money, and frustration.
At LenZip USA, we’ve been designing and manufacturing heavy-duty travel and industrial zippers since 1946. From suitcase zippers and backpack closures to marine and tactical gear, our U.S.-made zippers are engineered for strength, reliability, and smooth operation. This guide walks you through every aspect of repairing or replacing luggage zippers — from identifying the problem to choosing quality replacement parts that last.
Why Luggage Zipper Replacement Makes Sense
Replacing or repairing a suitcase zipper can add years of life to your favorite luggage. Most travelers are surprised to learn that zipper issues rarely mean the entire bag is ruined. In fact, about 80% of luggage zipper problems stem from the slider, not from broken teeth or torn tape.
That’s good news for frequent fliers. A new slider, pull, or stop can often restore full function for less than $20, while a professional zipper replacement typically costs $75–$125 — far less than the price of a new suitcase.
Luggage brands know that the zipper is often the first point of failure. That’s why many premium bags now feature heavy-duty molded or double coil zippers designed for smooth operation and long-term reliability. By learning how to diagnose and fix common zipper problems, you can extend your luggage’s life and keep it travel-ready for years.
If you’re curious about zipper materials and how they perform under stress, check out Zipper Materials & Finishes.
Diagnose Before You Replace: What Really Went Wrong
Before replacing your luggage zipper, take a few minutes to inspect what failed. Common luggage zipper problems fall into a few categories:
Stuck zipper: Caused by dirt, fabric, or corrosion lodged between the teeth.
Loose slider: The slider stretches over time, causing teeth to misalign or separate.
Broken pull tab: A missing or snapped pull tab can be temporarily replaced with a paperclip or key ring.
Separated teeth or torn tape: These are signs of serious damage requiring full replacement.
Often, a stuck slider just needs a quick cleaning and lubrication. A dab of wax, graphite, or zipper lubricant can get things moving again. If your suitcase zipper is separating even when the teeth appear intact, the slider has likely widened and needs replacing.
For step-by-step guidance on identifying the cause of failure, review How to Fix a Zipper.
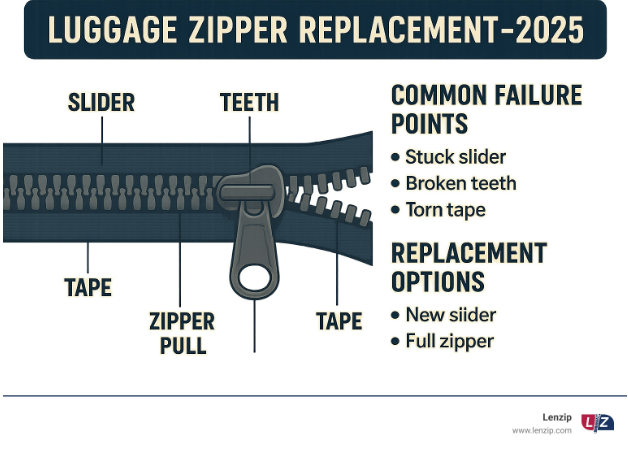
Understanding Zipper Anatomy: Choosing the Right Parts
A zipper is a precision-engineered system made up of several key parts. Knowing how these components work together will help you choose the right replacement.
The tape is the fabric that holds the zipper teeth, and it needs to be strong, tear-resistant, and flexible. The teeth — whether coil, plastic, or metal — interlock to form the chain. The slider moves along the chain to open or close it, while the pull tab gives you something to grip. Finally, stops at the top and bottom keep the slider from sliding off.
LenZip’s Guide to Zipper Teeth, Sliders, and Their Parts provides a detailed look at every element of zipper construction, perfect for repair specialists and luggage designers alike.
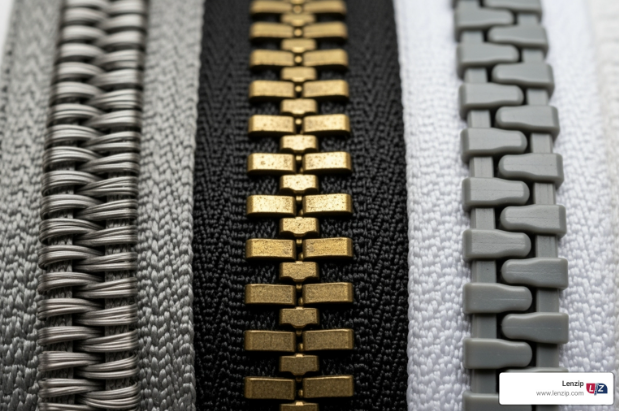
Types of Luggage Zippers
Most luggage features one of three main zipper types:
Coil zippers — Made from nylon, flexible, and lightweight. Perfect for curved suitcase openings and expandable sections.
Molded plastic zippers — Durable, rust-proof, and available in various colors. These are common in double zipper luggage and heavy-duty travel gear.
Metal zippers — Found in high-end or luxury luggage, offering unmatched strength and a polished look.
Many suitcases also use two-way separating zippers, allowing you to open from either end — an essential feature in expandable or multi-compartment bags.
To match replacement parts, measure the zipper gauge (e.g., #5, #8, or #10). This number reflects the chain’s closed width in millimeters. You’ll often find it stamped on the back of the slider or near the tape edge. If unsure, visit the Zipper Gauge & Chain Size Chart for guidance.
Simple Fixes vs. Full Luggage Zipper Replacement
Once you understand the problem, decide if a simple fix will do or if a complete zipper replacement is necessary.
If your slider is the issue, replacement is quick and inexpensive. Match the slider’s size and type to the existing zipper, then either crimp or snap it into place. This solution restores most luggage zippers that have separated or lost grip.
If the tape is torn, the teeth are broken, or the zipper has detached from the bag, a full zipper replacement is the only lasting fix. Zippers are under constant tension, and once the structural integrity is compromised, patches or glue will not hold.
High-quality materials make all the difference. Learn more about zipper fabrics and coatings at Zipper Materials & Finishes to ensure you’re choosing components built for travel durability.
Finding Replacement Sliders and Zipper Chains
When you only need to replace a slider, measure carefully and buy the exact match for your zipper type and gauge. Luggage typically uses dual sliders, so consider replacing both to maintain even wear.
If the zipper chain or tape is damaged, purchase continuous chain (also known as zipper by the yard). This gives you the flexibility to cut to length and attach new sliders and stops. It’s ideal for luggage with long or curved closures.
You can learn more about this approach in LenZip’s guide to Zippers by the Yard and Continuous Chain vs. Finished Zippers.
When measuring, remember it’s easier to trim a longer zipper than to stretch a short one. Precision ensures smooth closure and balanced tension on both sides.
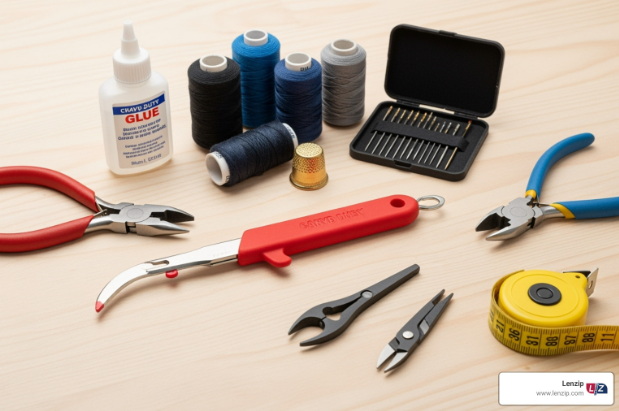
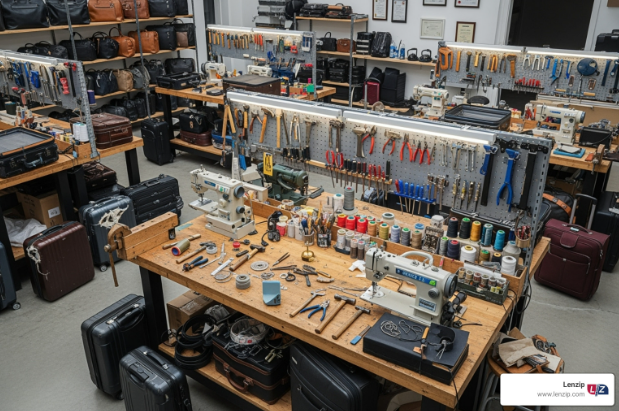
DIY Toolkit for Suitcase Zipper Replacement
For travelers or repair enthusiasts, replacing a luggage zipper is a satisfying and affordable project. Gather the following tools before you begin:
A seam ripper to remove the old stitches without damaging the luggage fabric.
Heavy-duty nylon or polyester thread, the same used in upholstery or industrial sewing.
A strong needle or curved needle to maneuver through thick material.
Flat-nose pliers to attach new stops or pull sliders into place.
Fabric glue or clips for alignment while sewing.
A measuring tape for accuracy.
To begin, remove the old zipper with the seam ripper, working slowly to avoid tearing. Align the new zipper exactly where the old one sat, then temporarily secure it with pins or glue. Stitch carefully — if sewing by hand, use a backstitch for strength. If you have access to a heavy-duty sewing machine, use it to speed up the process.
Once the zipper is attached, install new stops using pliers and test it several times before final trimming. For more zipper assembly tips, visit Zipper Engineering 101.
Tips for a Long-Lasting Repair
Durability comes down to materials and precision. Use only heavy-duty thread and reinforce stress points where the zipper starts, ends, or curves. Keep the zipper perfectly straight — a crooked chain will cause uneven tension and premature wear.
After finishing, open and close the zipper repeatedly to confirm smooth travel. Apply a small amount of silicone-based lubricant (avoid oils, which attract dirt) to the teeth for extra protection.
For more advanced maintenance advice, see Zipper Care Tips to Make Them Last Longer.
When to Choose Professional Luggage Zipper Repair
While DIY repairs are rewarding, not all luggage zippers can be fixed at home. Complex or high-value bags benefit from professional attention.
Professional technicians have specialized equipment to handle thick fabrics, curved seams, and double coil zipper luggage designs. They can also color-match replacements and ensure structural balance so your luggage performs like new.
If your luggage includes anti-theft zippers, double sliders, or embedded lock systems, a professional should handle the repair. Additionally, check your manufacturer warranty — some cover zipper failures under lifetime protection.
On average, professional repairs cost $75–$125, depending on complexity. Compared to replacing a $300 suitcase, professional zipper replacement is a sound financial and sustainable choice.
How to Find a Reliable Luggage Zipper Repair Service
Finding a trusted repair professional doesn’t have to be difficult. Local shoe and leather repair shops are often well-equipped for zipper replacement since they handle heavy materials daily. Luggage stores can also recommend specialized technicians.
For designer or high-end luggage, look for authorized repair centers that carry manufacturer-approved parts. If local services aren’t available, mail-in repair providers can perform the job remotely. Always verify reviews and shipping times.
Visit LenZip Resources for insights into zipper materials and configurations that your repair technician will need to reference.
LenZip: Your Partner for Travel-Ready Zipper Solutions
Since 1946, LenZip USA has been one of America’s most trusted zipper manufacturers, providing high-quality components for luggage, apparel, marine, and industrial applications. Every zipper we produce is tested for strength, corrosion resistance, and cycle durability to ensure years of reliable use.
If you’re an OEM luggage maker, repair specialist, or traveler looking for reliable hardware, explore LenZip’s full line of Products and Custom Zippers. For quotes or samples, Request a Quote.
Durable luggage starts with dependable zippers — and at LenZip, that’s exactly what we build
Frequently Asked Questions About Luggage Zipper Replacement
Can any broken luggage zipper be fixed?
Most zipper problems are repairable. If the teeth, tape, or chain are intact, you can usually restore function by cleaning, lubricating, or replacing the slider. Severe damage — like teeth separated from the fabric or torn tape — requires full replacement. Assess your luggage’s overall condition before deciding.
How much does luggage zipper replacement cost?
DIY repairs cost under $20, while professional services range from $75 to $125. The total depends on zipper length, material, and bag design. Investing in quality repair extends the life of your luggage and reduces waste.
What type of zipper is best for luggage?
For strength and flexibility, molded plastic zippers and nylon coil zippers are top performers. Metal zippers provide a high-end finish and extra durability. For premium travel gear, look for double zipper luggage with dual sliders for balanced stress distribution.
How do I prevent suitcase zipper failure?
Avoid overpacking, which strains the chain and slider. Keep zippers free of dirt, sand, and lint. Periodically clean and apply a silicone-based lubricant. Store luggage in a cool, dry space to protect materials and prevent corrosion.
Can I replace a luggage zipper myself?
Yes — with patience and the right tools. A seam ripper, strong thread, and replacement zipper or slider are usually all that’s needed. Follow LenZip’s Zipper Replacement Guides for step-by-step help.
Do all luggage zippers come in standard sizes?
No, luggage zippers vary in width and strength. Smaller bags may use #5 chains, while large suitcases typically use #8 or #10 gauges for heavy-duty performance. Always verify sizing before ordering replacement parts.
What is a double zipper system?
A double zipper luggage system uses two sliders on the same chain, allowing opening from either end. It offers better balance, convenience, and security — especially for travel gear that uses padlocks or TSA-approved locks.
How do I find the zipper size on my suitcase?
Look for a small number engraved on the back of the slider or stamped into the tape. That number represents the zipper gauge (e.g., 5 = #5 zipper). You can also measure the chain width in millimeters and match it using LenZip’s Zipper Gauge Chart.
Are luggage zippers waterproof?
Not all are. Standard coil and metal zippers offer minimal water resistance. For added protection, some luggage features PU-coated or water-resistant zippers. If you travel in humid or rainy climates, request zippers with hydrophobic coatings like those discussed in Zipper Coatings & Finishes.
What’s the best way to clean a luggage zipper?
Use a soft brush and mild soap solution to remove grime from the chain. Rinse thoroughly and let dry before applying lubricant. Avoid submerging metal zippers for long periods to prevent corrosion.
Can I upgrade to a stronger zipper?
Yes — many luggage owners upgrade to heavy-duty zippers for better performance. LenZip’s U.S.-made molded and coil zippers can be cut to length and retrofitted into most travel gear. Visit Request a Quote to explore options for custom replacements.